
Exploring DigitalOcean Functions
Unraveling the Power of Cloud Simplicity - DigitalOcean Series - Part 4


14 min read
Welcome to the fourth part in my series on DigitalOcean. This post explores DigitalOcean Functions, a serverless computing solution provided by DigitalOcean. Serverless computing has become a significant trend in the development community, offering a way to execute code in response to events without managing the underlying servers. This approach can simplify the deployment and scaling of applications, potentially leading to operational efficiencies and cost savings. DigitalOcean Functions fits within this landscape, aiming to provide developers with a platform for building and running applications and services in a serverless environment.
Introduction to DigitalOcean Functions
DigitalOcean Functions is a serverless computing service offered by DigitalOcean. It aligns with the broader industry move towards serverless architecture, where the management of server infrastructure is abstracted away from the developer. This service enables the execution of code in response to events without the need for provisioning or managing servers, which can simplify certain aspects of application development and deployment.
Serverless computing, as a model, emphasizes scalability and operational efficiency. DigitalOcean Functions automatically scales computing resources to match the demand of the executed functions, potentially providing cost savings by charging for the actual compute time used rather than maintaining idle servers.
This service supports several programming languages, allowing developers to write functions in environments they are familiar with. The integration of DigitalOcean Functions into existing workflows can be straightforward for those already using DigitalOcean's ecosystem, though it requires understanding of the serverless paradigm and its implications on application design and deployment.
DigitalOcean Functions positions itself as a solution for developers looking for scalable, event-driven compute options. Like any cloud service, it presents a trade-off between simplicity, scalability, and control. Automatic scaling simplifies operations but requires careful consideration of function design to manage costs effectively. The platform's pricing model is based on the number of function invocations and compute resources consumed, which aligns with common serverless pricing structures but necessitates monitoring and management to optimize expenses.
In summary, DigitalOcean Functions offers a path for developers to leverage serverless computing within DigitalOcean's ecosystem. It provides a platform for building and deploying applications that can benefit from on-demand scalability and operational simplicity. As with any technology choice, the benefits must be weighed against the requirements and constraints of each specific project.
Deploying a New Function
Deploying a new function on the DigitalOcean platform involves a few key steps, from setting up your local environment with the necessary tools to writing and deploying the function itself. This section will guide you through the process, featuring code examples to clarify each step.
Setting Up the DigitalOcean CLI
To interact with DigitalOcean services, including Functions, the DigitalOcean Command Line Interface (CLI), doctl, is essential. Here's how to set it up:
Installation:
macOS: Use Homebrew with the command
brew install doctl.Windows: Download the executable from the DigitalOcean GitHub repository and add it to your PATH.
Linux: Download the binary from GitHub or use snap with
snap install doctl.
Authentication: After installing
doctl, authenticate it with your DigitalOcean account by running:doctl auth initYou will be prompted to enter your DigitalOcean API token, which can be generated in the API section of the DigitalOcean dashboard.
Writing Your Function
With doctl configured, you can now focus on creating your function. Below is a simple example of a function written in Node.js that returns a greeting:
// greetings.js
module.exports = async (req, res) => {
    res.status(200).send("Hello from DigitalOcean Functions!");
};
This function listens for HTTP requests and responds with a simple greeting message.
Deploying Your Function
To deploy your function to DigitalOcean Functions, follow these steps:
Prepare Your Function for Deployment: Ensure your function's code is saved in a file, e.g.,
greetings.js. You might also want to include apackage.jsonif your function depends on external npm packages.Deploy Using
doctl: Navigate to your function's directory in the terminal, and deploy your function usingdoctl. If this is your first deployment, you may need to specify additional details about your function, such as name and entry point:doctl serverless deploy . --remote-buildThe
--remote-buildflag tellsdoctlto upload your code where it will be built and deployed in the DigitalOcean cloud.
Example: Deploying a Function with External Dependencies
If your function relies on external npm packages, your project should include a package.json file. Here's how you might set up a function that uses the axios package to make HTTP requests:
// fetchData.js
const axios = require('axios');

module.exports = async (req, res) => {
    try {
        const response = await axios.get('https://api.example.com/data');
        res.status(200).send(response.data);
    } catch (error) {
        res.status(500).send(error.toString());
    }
};
And your package.json:
{
  "name": "fetch-data-function",
  "version": "1.0.0",
  "main": "fetchData.js",
  "dependencies": {
    "axios": "^0.21.1"
  }
}
To deploy this function, you'd follow the same steps as before, ensuring you're in the project directory when you run the doctl serverless deploy . --remote-build command. DigitalOcean Functions will automatically install any dependencies listed in your package.json during the build process.
Invoking Functions with doctl
After deploying your function to DigitalOcean Functions, invoking it to see it in action is a straightforward process using doctl. This section will guide you through invoking your deployed functions directly from the command line, providing a practical example to demonstrate the process.
Preparing for Invocation
Before invoking a function, ensure you have the doctl CLI tool configured with your DigitalOcean account, as previously discussed. The CLI must be authenticated and ready to interact with DigitalOcean services.
Invoking Your Function
To invoke a function, you need to know its name or the specific endpoint provided after deployment. You can invoke a function directly from the command line using doctl, specifying any required HTTP method, headers, or body data as needed.
For example, to invoke the greetings function deployed in the previous section, you would use the following command:
doctl serverless functions invoke greetings --method GET --wait
The
--method GETspecifies the HTTP method to use when invoking the function.The
--waitflag tellsdoctlto wait for the function's execution to complete and display the result.
If your function expects JSON data in the request body, you can provide it using the --body flag:
doctl serverless functions invoke processData --method POST --body '{"key":"value"}' --wait
This command sends a POST request to the processData function with a JSON body.
Handling Function Responses
Upon successful invocation, doctl will display the response from your function. This could be a simple message, JSON data, or any other format your function returns. If the function execution results in an error, doctl will display the error message, helping you diagnose and fix any issues.
Example: Invoking a Function with Query Parameters
Functions can also be invoked with query parameters to pass additional data. Here's an example of how to invoke a function with query parameters using doctl:
doctl serverless functions invoke fetchData --method GET --wait --query "param1=value1¶m2=value2"
In this example, fetchData is a function that might use the provided query parameters (param1 and param2) to fetch or filter data.
Automatically Re-deploy Functions with doctl serverless watch
To facilitate streamlined development workflows for serverless functions on DigitalOcean, the doctl command-line tool includes a feature named serverless watch. This utility is designed to monitor project directories for changes to function code and automatically trigger redeployments upon detection. This section outlines the utilization of doctl serverless watch for automating the deployment process during development.
Setting Up Automatic Redeployment
Before initiating the automatic redeployment process, it's essential to have the doctl tool properly installed and authenticated with the developer's DigitalOcean account. Instructions for installation and authentication can be found in the DigitalOcean documentation or the earlier sections of this series.
Initiating doctl serverless watch
Project Directory: Developers should start by ensuring their terminal session is focused on the project directory that contains their serverless functions.
Activate Watching: By executing
doctl serverless watchin the terminal, the tool begins monitoring the project directory for any file modifications:doctl serverless watchThis command prompts
doctlto observe for changes and automatically redeploys functions to the DigitalOcean environment upon detecting any updates.Development Process: As developers modify and save their function code, the
doctl serverless watchprocess detects these changes. The terminal provides feedback on the redeployment process, enabling developers to see the outcomes of their modifications in real-time.
Example Scenario
Consider a serverless function designed to return the current server time. The function might look like this in Node.js:
// serverTime.js
exports.handler = async function(event, context) {
    return {
        statusCode: 200,
        body: `The current server time is: ${new Date().toLocaleTimeString()}`
    };
};
With doctl serverless watch active, any adjustment made to serverTime.js will automatically trigger the function to be redeployed. This allows for immediate observation and testing of changes.
Advantages and Considerations
Efficiency: The
serverless watchfeature can enhance development efficiency by automating the deployment process, enabling developers to concentrate on coding and testing without manual redeployment interruptions.Workflow Simplification: This feature simplifies the development workflow, providing an unobtrusive means to ensure that the latest code changes are promptly deployed and available for testing.
Real-Time Feedback: It offers immediate feedback by allowing developers to test changes in a live environment promptly, facilitating rapid iteration.
While doctl serverless watch is a valuable tool for development and testing, it is advisable to use it within development or staging environments. For production environments, a more deliberate deployment strategy is recommended to manage and track changes methodically.
In summary, the doctl serverless watch command is an effective utility for developers seeking to automate and streamline the process of deploying serverless functions on DigitalOcean, enabling quick iterations and testing of function code.
Configuring Functions in the DigitalOcean Console
The DigitalOcean Console provides a user-friendly interface for configuring and managing serverless functions. This section outlines the steps to configure functions directly within the console, enabling developers to adjust settings, manage dependencies, and define environment variables without the need for CLI commands. This approach is beneficial for developers preferring graphical interfaces or those looking to make quick adjustments to their functions.
Accessing the Functions Section
Log In: Begin by logging into your DigitalOcean account and accessing the DigitalOcean Console.
Navigate to Functions: Within the console, locate the "Functions" section. This area is dedicated to serverless computing, where you can view and manage your deployed functions.
Creating and Configuring a New Function
Create a Function: To start configuring a new function, click on the "Create" button within the Functions section. This will prompt you to either select existing code or write new function code directly in the console.
Specify Function Details: Enter the required details for your function, such as its name, runtime (e.g., Node.js, Python), and the entry point (the function within your code that will be executed).
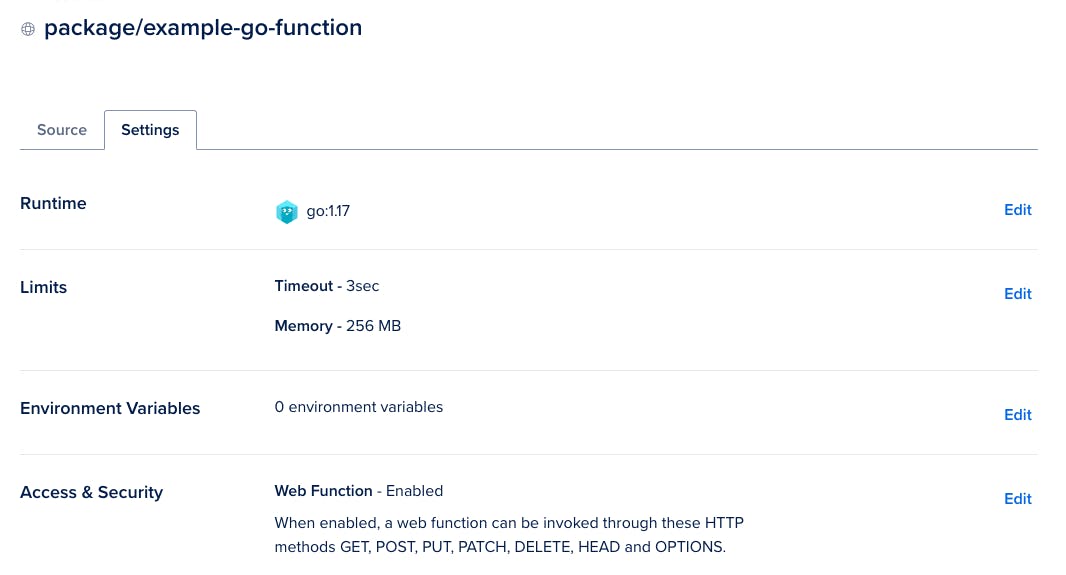
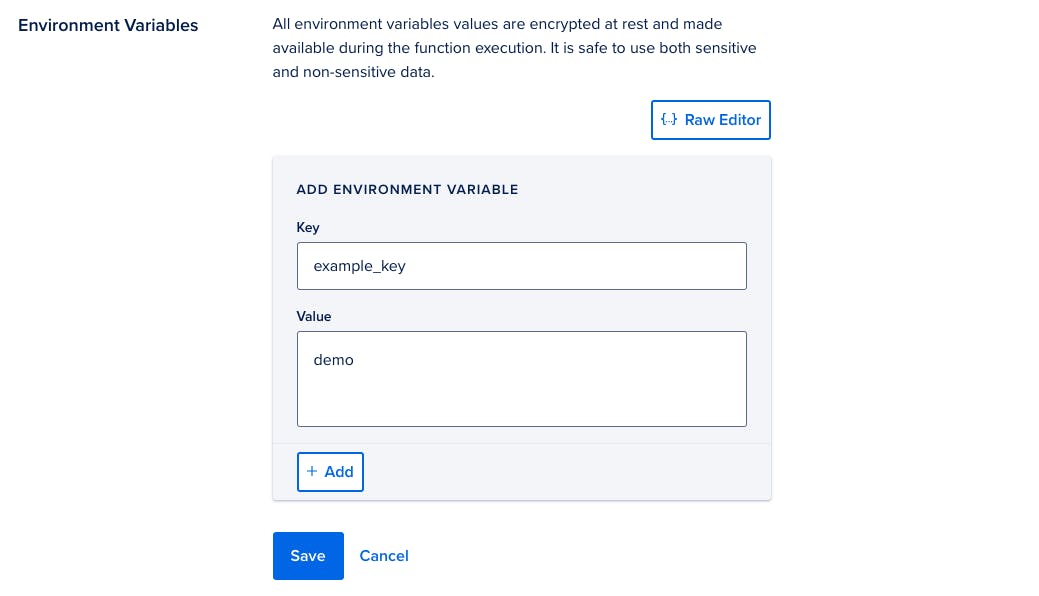
Add Environment Variables: If your function requires environment variables (e.g., API keys, configuration settings), you can add them during this step. Environment variables provide a secure way to include sensitive information without hard-coding it into your function's source code.
Define Dependencies: For functions that depend on external libraries or modules, specify these dependencies. In the case of Node.js functions, for example, this could involve listing required npm packages.
Deploying the Function
After configuring your function, the final step is deployment:
Review Configuration: Before deploying, review all the settings and configurations you've specified for your function. Ensure that everything is correct and as intended.
Deploy: Click the "Deploy" button to deploy your function. The DigitalOcean Console will handle the deployment process, including installing any specified dependencies.
Monitoring and Management
Once deployed, the DigitalOcean Console allows you to monitor and manage your function:
Invocation Logs: Access logs of function invocations to monitor its usage and troubleshoot any issues.
Edit Configuration: You can return to the function's settings in the console at any time to edit its configuration, update code, modify environment variables, or adjust dependencies.
Considerations
Ease of Use: Configuring functions through the DigitalOcean Console is straightforward, making it accessible for developers of all skill levels.
Flexibility: While the console offers convenience for configuration and deployment, some complex scenarios might still benefit from the flexibility of CLI tools or CI/CD pipelines for automated deployment.
Security: Always ensure that sensitive information, such as API keys, is stored in environment variables rather than in the function code itself.
Example Project Structures
Here is a minimal example of the structure of a project:
example-project
├── project.yml
└── packages
    └── example-package
        └── example-function.php
Here is an example structure for a project with two packages, example-package-1 and example-package-2. example-package-1has three functions, and example-package-2 has one.
example-project
├── packages
│   ├── example-package-1
│   │   ├── example-function-a.php
│   │   ├── example-function-b
│   │   │   ├── package.json
│   │   │   └── example.js
│   │   └── example-function-c
│   │       └── index.php
│   └── example-package-2
│       └── example-function
│           ├── requirements.txt
│           ├── __main__.py
│           └── example.py
└── project.yml
Creating a Scheduled Trigger with DigitalOcean Functions
DigitalOcean Functions supports the creation of scheduled triggers, a beta feature that allows functions to be executed automatically at specified intervals. This capability is especially useful for tasks such as running nightly batch jobs, sending regular notifications, or any routine that requires execution on a schedule. This section will guide you through setting up a scheduled trigger using the project.yml configuration file, which defines your function and its triggers.
Understanding Scheduled Triggers
Scheduled triggers use a cron syntax to define when the function should run. This means you can schedule your function to execute at regular intervals, specified by the cron expression included in your project.yml file.
Example: Creating a Function with a Scheduled Trigger
Consider a scenario where you have a function named reminderEmailFunction, designed to send out reminder emails daily at 9 AM UTC. You can set up this function and its scheduled trigger using the project.yml file as follows:
packages:
  - name: scheduled-email-project
    environment:
      EMAIL_SERVICE_API_KEY: ${env.EMAIL_SERVICE_API_KEY}
    functions:
      - name: reminderEmailFunction
        binary: false
        runtime: 'nodejs:default'
        web: true
        triggers:
          - name: daily-email-reminder
            sourceType: scheduler
            sourceDetails:
              cron: "0 9 * * *"
              withBody:
                name: 'sammy'
Deploying the Scheduled Function
To deploy this project with its scheduled trigger, ensure your project.yml file is in the root of your project directory, then use the doctl CLI tool to deploy:
doctl serverless deploy
This command deploys your function along with its scheduled trigger as defined in the project.yml file.
Cron Expression Basics
Cron expressions are a powerful way to specify scheduling patterns. They consist of five fields representing different units of time:
* * * * *
| | | | |
| | | | +--- Day of Week (0 - 7) (Sunday to Saturday, 7 is also Sunday)
| | | +----- Month (1 - 12)
| | +------- Day of Month (1 - 31)
| +--------- Hour (0 - 23)
+----------- Minute (0 - 59)
| Field | Allowed Values |
| minute | 0-59 |
| hour | 0-23 |
| Day of the month | 1-31 |
| month | 1-12 or JAN-DEC |
| Day of the week | 0-6 or SUN-SAT |
There are also a few special characters you can use to express more complex schedules:
*: The asterisk is a wildcard that represents “all”. A schedule of* * * * *runs every minute of every hour of every day of every month.,: Commas allow you to list multiple values for a field. If you want to have a task run at the beginning and middle of every hour you could achieve this with0,30 * * * *.-: A hyphen represents a range of values.0-29 * * * *triggers every minute in the first half of each hour./: You can use a forward slash after an asterisk to express a step value. For example, to run a command every three hours you could use0 */3 * * *.
Example cron Schedules
Here are some more examples of the cron scheduling syntax:
* * * * *– Every minute12 * * * *– 12 minutes after every hour0,15,30,45 * * * *– Every 15 minutes*/15 * * * *– Every 15 minutes0 4 * * *– Every day at 4:00 AM0 4 * * 2-4– Every Tuesday, Wednesday, and Thursday at 4:00 AM20,40 */8 * JUL-DEC *– On the 20th and 40th minute of every 8th hour every day of the last 6 months of the year
Pricing
DigitalOcean's pricing for Functions is based on usage, including the number of function invocations, execution time, and memory used.

This model allows for scaling from small to large applications, offering a free tier for getting started and flexible pricing tiers for growing applications.
Conclusion
Deploying functions with DigitalOcean offers a streamlined path to embracing serverless computing, allowing developers to focus more on code and less on infrastructure. By following the steps outlined above, you can deploy your functions efficiently, taking advantage of the scalability and flexibility serverless architecture provides.
Thank you for following along in this detailed exploration of deploying functions with DigitalOcean. Stay tuned for more insights and tutorials in our continuing series.